Showing posts with label Tau. Show all posts

Friday, August 5, 2011

Tau: Shas' El


Been obnoxiously busy over the past 2 weeks and haven't had an opportunity to post anything. Today I'm just going to present one of my Tau Shas' El Crisis Suits. I used the same paints for this guy as I have for all the others. Like my Shas' O, this suit also got the 4x magnet treatment.


I did cave in and do a slight modification to his head. I really don't like the standard head component, and decided to create more visual interest and height by integrating the Tau target lock. I basically cut out a small square at the bottom of the target lock and mounted the remaining piece on to the center front of the crisis suit head.

I have two suits with heads like this, so I use them either as Shas' El or team leads.

Wednesday, July 13, 2011

Tau: Shas' O


I picked up the 9 suit Apocalypse set back in the day, since it was a pretty solid deal. Unfortunately, three or four suits had very badly warped rear torsos. Unsalvageable. I contacted GW Customer Service and they shipped replacements. No fuss, no muss.

These guys are a quick and easy build. The lack of compound curves means I can scrape, file, and sand much more rapidly and still get very clean surfaces. The ankles are the only real engineering problem with the XV-8. They're rather delicate and won't handle too much torque. Once based, though, I think they're more survivable.


Since this is my Shas' O, I did go ahead and cut up the legs around the knees and arms in order to create a more dynamic pose. His stance is based on the Farsight artwork in the Tau Codex. His head is one of the two metal variants. In all other respects, he's a standard XV-8. All of my Crisis Suits have 4 neomydium magnets (1/8")- one in each forearm, and one at each corner of the top of the jump pack. These allow weapons swaps on the fly.

My Tau have a fairly consistent color scheme across infantry, vehicles, and suits: I airbrush Tamiya Buff over everything, followed by a wash of Devlan Mud and drybrushing of Vallejo Sand. Mechanical bits are painted Chaos Black with Fortress Grey highlights. Red panels are painted Vallejo Vermilion with highlights of Vermilion mixed with Vallejo Flat Yellow. Additional weapon details are picked out with Fortress Grey and Skull White highlights.

Tuesday, March 15, 2011

Tau: Tetra

The Tetra is another example of a nifty looking Tau unit that follows their alien design aesthetic. I love the sleek lines of the vehicle, and find the concept of a "hard top canopy" with open sides to be quite intriguing. It's just a really pretty skimmer.

On the other hand, even though it's a relatively cheap unit, it's also relatively useless. It's stealthy and fast, which balances out it's total lack of armor. It has the same firepower as an infantryman but carries a markerlight. Clearly it is meant as a scout vehicle or forward observer. The problem is it takes up a Fast Attack slot and with only the single markerlight there is hardly anything you can do with it in a regular game. Now, throw it on the board in an Apocalypse game and you can get away with a lot of mischief...

Building the Tetra was quick and mostly easy. The slight warping of the "canopy" was fixed with hot water. I did have to fill in some misaligned moldings, but they were not too bad. The mold release on the Tetra was so bad that I had to sand down every surface to some degree. The pulse rifles mounted on the chin were poorly cast and as a result I simply used leftover plastic rifles from my Fire Warrior stash.

Wednesday, March 9, 2011

Tau: XV88 Broadsides


I've said it before, and I'll say it again- Forge World kits are a crap-shoot. You may get perfection, you may get a pain in the ass. The XV88 is a far superior design to the standard XV8. It's also a far more labor intensive kit to build. The rail cannons were badly warped, the ammo belts would not align, there were mold separation marks that ran deep like valleys... but the design is awesome and the detail is sharp.

So, you take the good you take the bad, you take them all and then you have the Facts of...uh, sorry...got side tracked into a sit com from the 80s.

Immersion in boiling water will help fix the warped pieces and allow you to connect mis-aligned parts. Pinpoint application of superglue and small quantities of Green Stuff will fill bubbles and voids

One other major issue with Forge World kits is the mold release agent they use. Whatever it is, it's industrial strength. It is the only thing I've ever seen to make superglue bead up on application. I've soaked the parts in water, soap, detergent, Windex, alcohol, coke, and Simple Green. Sometimes, no matter how much I try to get the mold release off the part, it just won't go. As a result, I ALWAYS prime Forge World kits. I have a Forge World Vindicator that has a siege shield which I've primed and painted (partially) at least 3 times... and the paint still won't adhere, even after sanding down the part. The only other possibility is that the kits were sold before the resin fully cured and it's either still setting or de-gassing.


Back to the Broadsides...posing the kit is tricky because not only do you have to get the legs in a decent position (you can get a dynamic pose on the 60mm base, but in-game you are better off with the 40mm base), you have to get the arms mounted as well. The arms are trickier than the legs, because the XV88 has under-slung rail cannons which are further supported by auxiliary arms that run between sockets in the rear of the gun and sockets in the lower part of the backpack. That means when connecting the arms you need to take in to account the arm, ammo feed, and auxiliary arm...3 connection points, all at once. It's only slightly nightmare-ish.

When I'd finally assembled and primed the suits, I airbrushed Tamiya Buff over everything, followed by a wash of Devlan Mud and drybrushing of Vallejo Sand. Mechanical bits were painted Chaos Black with Fortress Grey highlights. Red panels were painted Vallejo Vermilion with highlights of Vermilion mixed with Vallejo Flat Yellow. Missile pod details were picked out with Fortress Grey and Skull White highlights.

Bases are medium and fine ballast...unpainted. I ought to go back and add something there. The figures are pinned to the bases using paperclips that run through the lower legs and feet then through the base, under which they hook into "L" shapes secured by superglue. The ankles are insanely delicate and require re-enforcement.

Broadsides are a lot of fun in the game...I've often been tempted to buy another. But no...I must...resist...

Saturday, March 5, 2011

Tau: Vespid Stingwings


Vespid. The very name sends shudders of fear through my opponents.

Wait...did I say "fear"? I meant "laughter".

Yeah, probably the worst option in the Tau codex, the Vespid are slightly over-priced, slightly under-powered, and very out-classed by the other Fast Attack options in the codex. Sure, you could use Vespid as a rapid reaction force, but with Tau, if your enemy is that close, you're already boned. You could use them as a suicidal unit to threaten your enemy, but against MEQ they'll get shot to pieces before doing much damage, and against GEQ they'll get swamped. In the handful of games where I have run Vespid they have not done well by any definition of the word.

They look good, though, and were fairly easy to paint. Since they're metal, the poses are limited. If GW upgraded their rules and released plastics, they might actually sell. Anyway, the metals were assembled and primed Armory White. I didn't bother with a base coat, but did add a few blue splotches around the figures. After that I just washed the figures with light washes of Asurmen Blue and even lighter Thraka Green and Badab Black. I did a very light and quick drybrush of Skull White. Claws were painted with Fortress Grey and washed with Badab Black at the roots. Another quick drybrush of Skull White picked out the edges.

Tausept Ocher came to the rescue for the neutron blasters, torso armor, and communion helm. Highlights came from Bleached Bone. The crystals in the blasters were left primed, then washed with Thraka Green and given a Skull White highlights along the edges. The leader's wing bling and gold bosses on the blasters got the standard Tau gold treatment.

Bases were medium and light ballast with a few chips of styrene sheet. The figures were molded with "something" under their feet, so I had to replicate that on the ground work for the bases.

Monday, February 28, 2011

Tau: Shadowsun


Shadowsun is a rather impressive little metal miniature. Very detailed and heavily influenced by the Anime style- even more so than the rest of the Tau army, in my opinion. The only thing that stands out is the blocky barrel at the end of each fusion blaster. I think they'd look better if they had rounded edges. Converting/modifying would have been fairly easy. Option A would have been to simply sand down the edges. Option B would have been to clip off the blocky barrels entirely and build styrene strip/sheet/half-round replacements. Generally, I tend to skip these sorts of mods and regret them later. It saves time that way. If you have read my earlier posts, you'll see I have far too many unbuilt kits to take time for the fiddlies. Anyway, I wanted to run Shadowsun sooner rather than later, so she got a quick and dirty treatment.

Painting was very simple. Armory White primer, followed by successive, lightened washes of Asurmen Blue and Badab Black. Once I had sufficient depth of color, I went over the entire figure with a quick drybrush of Skull White. Then I cleaned up the edges and added highlights with several applications of thinned Skull White. Joints and other mechanical details were painted Chaos Black and highlighted with Fortress Grey. I used Tausept Ochre for the fusion cannons, highlighted with Bleached Bone. Gold parts, as with all my Tau, started with a mix of Scorched Brown and Shining Gold, was followed by Shining Gold, and finished with Burnished Gold highlights.

Shadowsun comes with a pair of shield drones (not pictured) and a command link drone. These were painted the same way as Shadowsun herself. Though Shadowsun comes with a slot base, she's molded to look like she is landing on (or leaping off) a piece of rubble. I added some medium and light ballast from Woodland Scenics to the base to flesh out the piece. Scorched Brown, Badab Black, and a Bleached Bone drybrushing finished off the groundwork. The fence post was painted with Graveyard Earth, washed with Badab Black, then highlighted with Kommando Khaki.

I like running Shadowsun, but she tends to be a one-trick pony. Sure, if you are lucky (and run a Positional Relay and Pathfinder Devilfish) you can get her in your opponent's rear and punk two vehicles on the turn she arrives, but not always. Deep striking can work out really well or really poorly. Even with an invulnerable save and multiple wounds, her ridiculously low toughness means she can be instantly killed by just about anything. Her three attached drones will provide ablative wounds, but it's still rarely enough. Of course, like any Tau, once she gets in to close combat... Ah, well.

Wednesday, February 23, 2011

Tau: Shas O' Rmyr


I got a bit bored with the Tau character options and decided to pick up Rmyr when a relatively large Forge World order was placed. The kit itself was relatively hassle-free, mostly because the rear torso and jet pack components were from the plastic Crisis Suit. Forge World castings are always hit or miss. They're terribly inconsistent and when they're bad they're really bad. Since it's such a crap shoot, I have to take a deep breath any time I place an order. Rmyr had some slight warping and only a few pinholes. Both were easily fixed.

Posing Rmyr was tricky, since the joints have to be bonded using cyanoacrylate or epoxy cements. CA glue leaves less gunk to clean up, but cures very quickly. Epoxy allows for some working time but tends to leave gunk. I have been using CA, but in future may mix and match...using epoxy to join and pose from the torso down, then CA for the arms and feet and head where a faster setting cement would be beneficial.

Painting was straight-forward. Even though my Tau army is based on the Viorla sept, I wanted O'Rmyr to be the actual O'Rmyr and not a "counts as". Therefore I used the standard Tau color scheme. I primed Rmyr with Armory White, then covered most of him with Tausept Ochre. I lightened that up with highlights of Bleached Bone. Red Gore was used for the shield, pads, and other panels. Highlights were made from Red Gore and a touch of Bleached Bone. The black mechanical components were Chaos Black with Fortress Grey highlights. The gold bosses were painted with a mix of Scorched Brown and Shining Gold, followed by Shining Gold, and finally a highlight of Burnished Gold. The plasma guns and shield highlights were painted with gradients of Ultramarines Blue through Ice Blue. The base was a messy mix of Chaos Black with dabs of Scorched Brown, various washes, and a Bleached Bone drybrush. The Astartes standard had some gold on it, and a barely visible wolf's head was picked out with very diluted Bleached Bone.

Friday, February 18, 2011

Monday, February 14, 2011

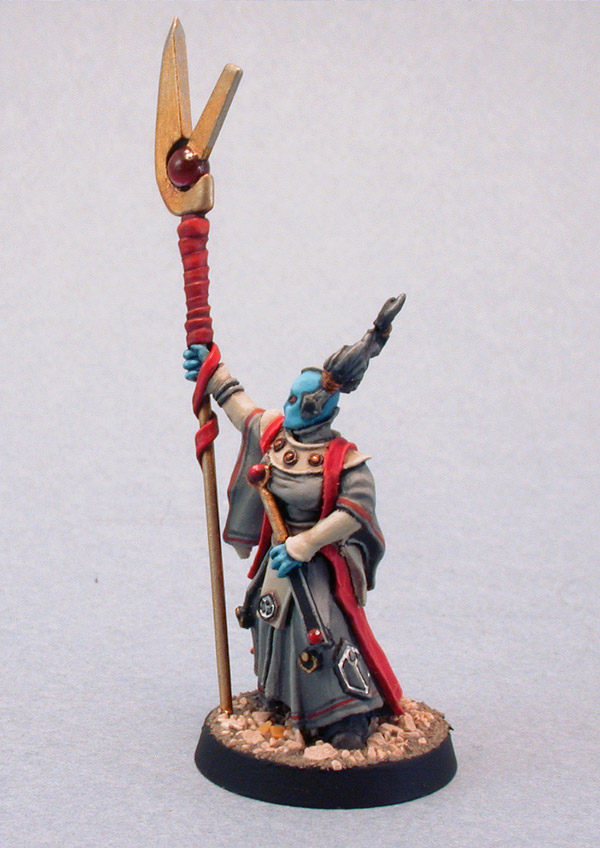
Tau: Ethereal


This Tau Ethereal was a bit of a conversion. The right hand wand was removed to make room for the staff, which was scratchbuilt from brass rod and styrene sheet. The globe is an acrylic sphere. The original head was removed and replaced with the head from Shadowsun. Other...enhancements...were sculpted from Green Stuff. Yes- I went overboard, but only because I mixed up too much Green Stuff and didn't want to let it go to waste. Yeah, that's the ticket.