It would appear that I've neglected this blog for about 3 months now. Oops.
I've got good reasons, though. The first is that I've been busy. Life, you know- it tends to get that way sometimes.
The second is that much of my recent activity, from a hobby perspective, has been going towards Infinity, and that gets posted on Remote Presence.
The final reason is the NOVA Open. In 2011 I volunteered to assist during the event as an appearance judge (see earlier post). I had a stupid crazy good time. Since I'm a total stick in the mud, that's saying a lot. This time around, for 2012, I've stepped up to take care of the event's online presence. We're rapidly gearing up, even though NOVA 2012 isn't until Labor Day weekend of next year.
The idea is to start spreading the word ASAP. The website, http://www.novaopen.com, is getting a full repaint, re-architecting, and new content. The goal is to go-live on December 1st, 2011- fully active and capable of accepting registration. So I've been rather busy trying to get that taken care of. We're also going to leverage Facebook and Twitter to help maintain interest all year and foster more of a community atmosphere.
I realize that I've only got 5 followers, and I personally know 3 of 'em, but dang it- I didn't want you guys to feel abandoned. Word, yo.

Saturday, November 19, 2011
Wednesday, August 31, 2011
NOVA Open 2011
Confessions of an Appearance Judge, or “Phantom Lanyard Syndrome”
I was asked to help out at the NOVA Open this year. Since I had never participated as a Staff member in any sort of con, I figured I’d give it a go. About a week before the event, we had a big prep meeting to stuff swag bags, review schedules, and assign duties. My initial offer was to help with the Appearance Judging, but I also got tapped to assist with the Trios Team Tournament. Since the schedule had Appearance Judging running from 6:30am till 8:30am, I figured it would be no problem at all. Things didn’t quite work out that way…
Starting at 6:30am sharp on Friday, folks slowly started to trickle in to the conference hall. Most walked right past the Appearance Judging tables and straight on to the gaming tables. A few placed their armies on the table and requested our attention. I’d like to say we “sprang in to action”, but since it was only 6:30 and I had only finished about half of my coffee, it would be more appropriate to say we “shuffled into some form of activity”. Thus began the first of three, fifteen-hour days of Appearance Judging. I’m still recovering. But you know what? I had a blast and have already told MVBrandt (the organizer) that I’m in for next year. Props to Appearance boss Geoff and my three cohorts Kevin, Jon, and Bob.
Once those first few brave souls stopped at our tables, others began to take notice and also started to bring their armies over. The same pattern repeated itself all three days, with lots of players coming over before Round 1, and then again in waves as games finished up. Except for a few rare moments, we always had at least one person at the judging station, and for the most part there were just four of us working full time to review over 350 armies.
So- what did I see and how did I look at it?
The NOVA information packet contained a solid overview of what the Appearance Judging would cover. Three categories: Army at a Glance, Better than Crayon, and Frankenstein were on the menu. The simplest criteria to assess were basing, display board, and model preparation. If the army didn’t meet the 3-color minimum, it got zeroed out right there. If bare plastic, primer or mold lines were apparent, scores were adjusted accordingly. After that, things got tricky. We were instructed to NOT judge on artistic or aesthetic merit- only on technical presentation. What does that mean? Well, if an army was purple and orange with yellow highlights, it didn’t matter. If an army had blobby paint, clear brush strokes, or harsh shading/highlights it did matter.
Most armies met the standard of Tabletop Quality, and as such we got to see a lot of really nice armies during the weekend. There were many armies that exceeded this level of merit and as a result we had to pull out flashlights to check for brush strokes and mold lines…fingerprints and file marks…glossy decals and painting outside the lines. Lots of guys mentioned “damage in transit or during play”. I don’t think that at any time we dinged anybody for this sort of mishap. Sh*t happens and we were quite willing to let it go. By the same token, display bases only accounted for a small percentage of the total score, since the primary focus of judging was on the army, not the base. Also, with many participants flying in to the area, display bases weren’t really an option. So the bulk of scoring rested in the paint job. This general approach also applied to the best painted mini (Better than Crayon).
Conversion (Frankenstein) also put a lot of value on the paint job, but an equal amount went to the physical alteration of the model. It quickly became apparent that some armies lend themselves to conversion easily (Orcs, Chaos, Imperial Guard) while others (Grey Knights) do not. The conversion score was based on complexity and execution. A helmet swap didn’t really count for much. Adding auto-cannons to make a Rifleman Dread (and there were soooo many of them) was a fairly common and average conversion. Significant kit-bashing and minor re-sculpts would vault the mini to the next highest level, while totally unique sculpts and major kit bashing would put the mini over the top.
I think that considering the workload, we did a pretty good job. The final review of armies for the top awards at the end of the Open was tricky. Four judges with strong opinions having to figure out the Best Of in each category… but in the end I’m satisfied that we got it right. The finalists in all the categories were the best of the best at NOVA, and even though only one award went out in each category, all the entries were impressive. Sometimes the final decision came down to very small technical calls (see above) following very intensive reviews. Yes, we looked under hulls and cloaks and shined light into very dark recesses.
Once we got slammed early Friday, it became apparent that I’d have no time to take proper photos of anything. My digital camera is ancient and was fairly useless anyway. Fortunately, we did have a photographer on Sunday and she was all over the hall, taking photos everywhere, and she was able to concentrate on the finalists as we were tallying the results, so I’m hopeful that there will be images available very soon via the official NOVA Open website.
I also regret that with the rush it was difficult to offer constructive advice to aspiring painters. If I came off as brusque or dismissive I have to apologize. I can easily be stand-offish at times, but even trying to be on more approachable behavior it was just really tricky to get through the backlog at times. Anyway, if anybody has any questions, feel free to post here and I will try to get back to you. Anything but actual scores (don’t have access to them, nor would it be allowed).
Final thought- I got a chance to chat with Gav Thorpe often during the weekend and have to say he was a really great guy. If you missed his reading on Saturday night, you missed out big time. Morgrim Dark and I took a quick break on Sunday and snagged Gav for a beer at the hotel bar and he was happy to provide some insights into the workings of GW as a company (Design Studio, Marketing, Management, etc.), comments on Black Library authors’ approaches to the 40k milieu, and a bunch of other stuff. NO, we didn’t ask about the next codex, mini, or other stuff.
Friday, August 5, 2011
Tau: Shas' El

Been obnoxiously busy over the past 2 weeks and haven't had an opportunity to post anything. Today I'm just going to present one of my Tau Shas' El Crisis Suits. I used the same paints for this guy as I have for all the others. Like my Shas' O, this suit also got the 4x magnet treatment.

I did cave in and do a slight modification to his head. I really don't like the standard head component, and decided to create more visual interest and height by integrating the Tau target lock. I basically cut out a small square at the bottom of the target lock and mounted the remaining piece on to the center front of the crisis suit head.
I have two suits with heads like this, so I use them either as Shas' El or team leads.

Wednesday, July 13, 2011
Tau: Shas' O

I picked up the 9 suit Apocalypse set back in the day, since it was a pretty solid deal. Unfortunately, three or four suits had very badly warped rear torsos. Unsalvageable. I contacted GW Customer Service and they shipped replacements. No fuss, no muss.
These guys are a quick and easy build. The lack of compound curves means I can scrape, file, and sand much more rapidly and still get very clean surfaces. The ankles are the only real engineering problem with the XV-8. They're rather delicate and won't handle too much torque. Once based, though, I think they're more survivable.

Since this is my Shas' O, I did go ahead and cut up the legs around the knees and arms in order to create a more dynamic pose. His stance is based on the Farsight artwork in the Tau Codex. His head is one of the two metal variants. In all other respects, he's a standard XV-8. All of my Crisis Suits have 4 neomydium magnets (1/8")- one in each forearm, and one at each corner of the top of the jump pack. These allow weapons swaps on the fly.
My Tau have a fairly consistent color scheme across infantry, vehicles, and suits: I airbrush Tamiya Buff over everything, followed by a wash of Devlan Mud and drybrushing of Vallejo Sand. Mechanical bits are painted Chaos Black with Fortress Grey highlights. Red panels are painted Vallejo Vermilion with highlights of Vermilion mixed with Vallejo Flat Yellow. Additional weapon details are picked out with Fortress Grey and Skull White highlights.
Movie Quick Take: Transformers- Dark of the Moon
"...it's over, Prime"
(review contains spoilers)
Went to see Transformers 3 last night in 3D. Usually I don't go for the 3D (not very fond of the effect or the price) but the timing was right. My buddy and I settled down with only the slightest hope that this installment might be better than the last one. If you haven't seen Transformers 2: Revenge of the Fallen...don't. Just be content to know it's a turd. I mean...really, really bad. And dumb. Not the usual Michael Bay dumb- more of an offensive dumbness, a mind-dulling dumbness that leaves you feeling enstupidated after you finish the movie. I digress.
Once again we get to enjoy adventures with everybody's favorite transforming giant robots. Notice I included the word "giant" there. There are 2 midget Autobots with whom we enjoy nothing. This time around, Megatron is off in the background, scheming to enslave humanity, defeat the Autobots, and rule Cybertron. Natch. His machinations, however, are evident throughout the film, and there is far more of a plot in this film than the last film. Regrettable it still feels like those plot lines have been rushed through the pipe as quickly as possible in order to just get on with the explosions. Too bad, as a bit more investigation and mystery could have added tension and suspense to the movie overall.
OK, it's about giant robots beating the tar out of each other, but here's a major problem- total lack of character development for Sam (Shia Leboufbouf) means that you, as a viewer, don't give a crap what happens to him. At all. When you feel a greater emotional investment in the robots...there's a major issue. The human touch point has lost its relevance, and as such is not necessary anymore. Why bother with ANY people this time around? Stick with the robots and be done with it.
The opening 10 minutes, the "set-up", was masterfully done. Rapid jump cuts and effects told us everything we needed to know as quickly as possible. After that...meh. Boring relationship stuff with Sam and his new Eye Candy. Pointless cameo roles from better actors (Malkovitch, McDormand) and more entertaining actors (Turturro, Tudyk, Jeong) who seemed very out of place. Also, a painful appearance by Buzz Aldrin playing Buzz Aldrin. It would also appear that Lane Kim managed to graduate and now works for the NSA. Yes- I do watch Transformers AND Gilmore Girls. Deal.
Right...something else, I was distracted. Where was I?
Explosions. I think the last half hour was one big explosion that went around the screen destroying everything. Buildings, planes, cars, boats, robots, people, planets... Lots of violence in this Transformers. Not just the kind where you bust a cap into an Autobot prisoner' head at point blank range, or punch through a Decepticon's sternum and blast his head clean off from within...no, I mean the kind where high caliber weapons literally vaporize people on screen leaving charred bones to fall to the ground. Cute, yes? I think the younger (inappropriately younger, I must point out) kid a few seats down from me started freaking out. Good job Mom!
From a nerd perspective, I did enjoy all the voice performances. Nimoy was just as good playing Sentinel Prime as he was playing Galvatron. Towards the end, I think he may have been channeling a bit of Galvatron, too. A few cute nods to prior Transformers lore, and even a good tip of the hat to some Trek as well. The Decepticons became even more faceless this time around, and Megatron came off as petty. Oh well.
I only wish that Bay could keep his cameras locked down for more than 2.6 seconds at a time. Unsurprisingly, Michael Bay's films suffer from the "Michael Bay Effect"...too much jitter, too highly kinetic to register visually...overstimulating.
Bottom line: not a great film, but certainly entertaining. I'd add it to my collection if it was on sale. If you like Bay films, this is for you. If you like Transformers, you'll have mixed feelings. If you like solid storytelling and character development and engaging plots... here; check out this video.
Saturday, July 2, 2011
Painting: Urban Camo
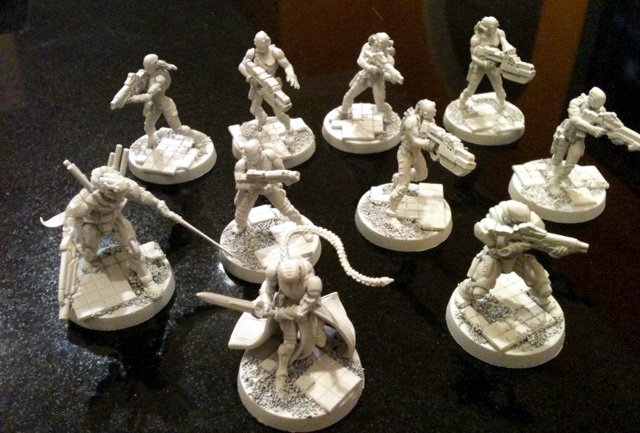
I've caught up with taking pictures of my Tau (to be posted in future) and started with my Ultramarines. The first squad was going to be my Scouts, but once I had them on the table I realized that I'd never "finished" their cloaks. So, away went the lightbox and out came the paintbrush. Rather than complete the process on all three figures, I decided to leave them in-progress in order to take this photo.

The cloaks were originally just Chaos Black with a dry-brushing of Fortress Grey for highlights. Subsequently, I outlined the blocks of angular camo with Fortress Grey (far left figure), then filled them with more Fortress Grey (center figure). Shading was done by adding VERY small amounts of Chaos Black, darkening as the blocks receded into the folds of the cloaks. Simple, quick, and effective.

The cloaks were originally just Chaos Black with a dry-brushing of Fortress Grey for highlights. Subsequently, I outlined the blocks of angular camo with Fortress Grey (far left figure), then filled them with more Fortress Grey (center figure). Shading was done by adding VERY small amounts of Chaos Black, darkening as the blocks receded into the folds of the cloaks. Simple, quick, and effective.
Wednesday, June 29, 2011
GW Pricing: It ain't that bad, folks
Sure, the topic has been beaten to death, but I figured I'd throw my two inflation-adjusted cents into the ring. There have been some good comments and postings about comparing the price of the miniature wargaming hobby to other hobbies, but quite often they're comparing apples to oranges. What about comparing apples to apples? OK, with that we'd wind up comparing Games Workshop to Mantic or Privateer, which would defeat the purpose. Therefore, I'm going to compare peaches to apricots: Miniature Wargaming vs. Scale Modeling.
For example, lets say you want to buy a Rhino transport. That's about $33 on the GW website. Kind of expensive for such a small kit, right? Compare it, then, to a 1/35 Sherman tank from Tamiya. That'll run you about $35. Moving on- check out the infamously expensive Land Raider. That little brick will set you back $66. A 1/35 Maus (super-heavy german tank from WWII) from Dragon will run about $55.
I use these two examples because once assembled, the vehicles are similar in size, so it's relatively easy to compare the pairings. So, what do you get for your money, other than a brick of plastic?
Historical armor kits from a major manufacturer will provide astounding levels of fine detail. You'll probably get link-and-length treads and quite often a set of crew figures. Some newer kits even come with limited photo-etched parts. The finished piece will be very accurate to it's subject and more often than not bee too fragile to do anything besides sit on a shelf as a permanent display piece.
A wargaming kit, on the other hand, will be an odd hybrid- halfway between a replica and a toy. Not detailed enough to match a historical kit but not sturdy enough to be a toy. Still, you'll get a lot of plastic- just not anywhere near as many pieces as you might see with a regular kit.
Companies like Tamiya, Dragon, Monogram, etc., don't have to pay licensing fees (usually, though it may change in future) or creative designers to manufacture their kits. GW, on the other hand, has to generate unique new designs, market the kits, and protect their intellectual property. Though not huge, it will impact the overall pricing of the kit.
The same applies to figure kits. Going with the 1/35 scale, being pretty close to the 28mm gaming scale, you can usually find an infantry squad in a box, fully equipped, for around 10 to 12 dollars. If you get two sets to equal the standard 10-man infantry squad in 40k, for example, you'd be paying $20-25. This, though, is where the bang-for-your-buck equation is often inverted. I rarely see infantry sets that can match wargaming squads for what I'll call "bulk". I'm not saying you get a greater value, but you do seem to get "more" in the wargaming box for about $28. Like the 1/35 vehicles, 1/35 scale infantry are more delicate and detailed than their 28mm cousins, but not as robust.
I have subscribed to Fine Scale Modeler for years and read the new kit releases every issue. That being said, I haven't really looked at the prices listed for a long time. So, when I decided to take a look recently, it ocurred to me that Games Workshop- the perennial villian, isn't pricing their product as exhorbitantly as we might like to gripe about.
Movie Quick Take: Cars 2
Spoiler Alert!
First off, I'll lead off this review with the caveat that I left about 20 minutes prior to the end of the movie. I went opening weekend, on a Sunday morning, with my two nephews, ages 4.5 and 2.5, and their dad. After no less than SIX previews, the younger only lasted about 25 minutes. The eldest stuck around for another 40 minutes, but eventually burned out as well.
I'll also say that I don't think Cars is one of Pixar's better films- in fact I think it's perhaps their weakest. Don't get me wrong- it's entertaining. The plot is simple. The characters are simple. Mater is ... simple. On the other hand, it's Disney's merchandising Golden Goose. The global sales of Cars merchandise has already surpassed eight BILLION dollars, so a sequel was a no-brainer.
And of course, no movie review on my blog would be complete without bitching about the practice AMC and Regal cinemas have of not replacing 3d lenses with 2d lenses when showing digital films. I saw Cars 2 at the Regal up in Rockville, Maryland, and it was DARK. The cars are painted in freaking neon paint and they still looked dark. As usual, I snapped a photo of the projection booth. Wannaseeithereitis...

I digress.
Cars 2 had to move beyond the basic Making Friends with Different People / Be Humble and Respectful / Be Good and Good Things Come To You storyline. So they went with the Environmental Message / Let People be Who They Are / Kill Lots of Cars option.
Wait...did I just say Kill Lots of Cars? Yes. Yes I did. Basically, Cars 2 is James Bond on wheels. Almost more like Get Smart. Mistaken identity. International intrigue. Lots of vehicle on vehicle violence via guns (yes, guns), missiles (S8 AP4), and internal explosions. It was rather disconcerting for me to sit next to my nephew and watch a car voiced by (the always awesome) Bruce Campbell get his innards boiled and violently combusted by a camera-mounted microwave doohickey. But by then the (auto)body count was at least 2 dozen, so I was already a bit numb.
Anyway, there was one fairly solid race sequence that captured my nephew's attention for a good 15 minutes. The rest was standard fare...but kind of convoluted for a younger viewer. I was just starting to get interested in where things were going when I was told it was time to go "sit with Daddy". Being the favorite uncle, I had to oblige. Bottom line, though... I really didn't care too much about missing the conclusion.
Cars 2- not as good as Cars 1. Cars 1- not as good as Toy Story 3...etc.
Vehicle Detailing
When I started putting together my Death Korps army, I began with the armor. Since I picked up the Apocalypse sets back when they were released, I had 3 Leman Russ and 3 Basilisk kits already on hand. I also picked up a few Forge World goodies, including the Bombard, Salamander, Vanquisher Turret and Exterminator Turret. Not being a fan of the standard Leman turret, I decided to upgrade it with extra detail.
The first thing I did was extend the Battle Cannon. The standard Battle Cannon is too short for my tastes. I prefer the Ryza pattern that the Death Korps uses. Simple enough conversion: Cut out the mid section of the barrel and replace with styrene tube of similar diameter. No fuss, no muss, and you get an extra 3/4 inch or so of length. I could have removed the muzzle at the end of the barrel and made the gun look even more like the Ryza variant, but I was doing it on the fly and didn't think about that option till well after the fact. Oops.
The next thing on my to-do list was to trash the regular plastic hatches. I do not like the high profile at all. When GW released the Steel Legion kits (so I believe), they included metal replacement hatches that were much more flush with the top of the turret...so much so that the cupola was almost entirely gone. Since the Forge World turrets used this style, I was able to replicate it in styrene. Using a compass to measure, I was able to cut various thicknesses of styrene sheet for the cupola and hatch. The bolts were cut from lengths of octagonal styrene rod. The handles were also cut from lengths of round styrene rod. The periscopes were cut from thicker styrene sheet, then beveled to match the Forge World turrets. It was a LOT of tedious work, but worth the effort.

After the hatches, I went at the glacis plate. The standard glacis on the Leman Russ looks kind of doofy. Again, with Krieg as my baseline, I went with the Mars-Alpha pattern look. I knew that modifying the rear/engine deck was out of the question, but felt that back-filling the forward hull and glacis plate would be simple enough. I was able to cut sheet styrene to fit behind the mounting point for the forward sponson, and then add some strip styrene above the new plate to make it look more solid. In the case below, I used a modified Space Marine lascannon to replace the Imperial Guard lascannon. The lascannon was extended a bit, then glued into place. Around the base I built up a blast bag using green stuff. Octagonal bolts were added afterwards. On another Russ I used a Heavy Bolter instead of the Lascannon.

Finally, I added a bit of extra armor on the relatively naked turret side. Again, sheet styrene cut to shape, surrounded by octagonal bolts came to the rescue. For that extra level of detail, I added a slightly thinned down Aquila. As before, the idea was to up-detail the tanks to be a better match to the Forge World turrets.

Saturday, June 25, 2011
Death Korps of Krieg: Shadowsword

When you absolutely, positively gosts to kill every mother-lovin tank on the board...accept no substitutes.
This is the Shadowsword variant titan killer. I messed around with the main hull a bit and managed to make it and the primary weapon removable. I can replace the turbo-laser with the vulcan mega-bolter, and also move up the main hull to expose the troop compartment behind. Pretty easy due to the excellent fit of the kit.

Wednesday, June 22, 2011


Friday, June 17, 2011
Death Korps of Krieg: Bombard


I picked up the Bombard before the new IG release provided rules for the Colossus. The mortar is identical, but the Bombard uses the Leman Russ chassis while the Colossus seems to use the Chimera. Forge World provided all the parts necessary for the Bombard- plastic treads and skirts from the Leman Russ, and resin replacements for the hull, mortar, and manipulator arm.
As you can see in the photos, I wound up with a "pebbly" finish on this model. In retrospect I should have re-primed the whole thing, but I was painting a whole armored company "assembly line" style and didn't have the inclination. Overall it came out fine. The manipulator arm was tricky to pose, so I eventually just used thin brass rod to act as both structural support and flexible joints. Since I put the time in to the arm, I went ahead and left the breach unattached so it could be posed either open or closed.
Wednesday, June 15, 2011
Damn You AMC!

So last night I went out with the GF to see the Lord of the Rings extended directors cut at the local AMC theater. They're showing each of the three movies, in succession, in order to promote the forthcoming Blu Ray releases. I had been looking forward to this for a while. Sure I own the DVDs and already have the Blu Rays on pre-order, but seeing the film on the big screen is more of an event to be enjoyed and shared, if possible. Anyway, since Super 8 had been such a visual disappointment, I was wary that AMC might pull the same shennanigans again with their digital projection equipment. Here's another article about it.
As I feared, AMC dicked me over again. I took a photo of the projection booth during Peter Jackson's intro to the film. He says that the film has been re-mastered and looks better than ever. On Blu Ray, I'm sure it's true. In the theater, however, it looked like crap. I'll be writing a letter to AMC which I'll cc New Line and Wingnut. Suffice to say, I will not be attending the second or third LotR movies, nor will I go to any subsequent films at AMC theaters if they are being shown on a digital projector.
Monday, June 13, 2011
Death Korps of Krieg: Salamander


Another Forge World model. The fighting compartment is the resin conversion component. The remainder of the vehicle is the standard Chimera. I magnetized the auto-cannon in case I want to throw in a heavy mortar instead and make it a Griffon.
Sunday, June 12, 2011
Movie Quick Take: Super 8
I've been heads-down painting details on the Yu Jing Agent (Pheasant) and had to take my eyes out of the magnifying lenses for a bit, so I decided to post a quick review of the movie "Super 8". I watched it last night and would give it a 3 out of 5 stars (or whatever).
I can't really get excited about the film. Fairly well written, fairly well acted, fairly well shot...you get the idea. The main character is a young boy who builds model kits as a hobby, so odds are if you are reading this, you'll get a kick out of that aspect of the story. The most noteable performance is by Elle Fanning. Not much of a spoiler when I sum up the plot by saying "ET with a vengeance". There are some sub-plots that don't add much to the story, and most of the characters are pretty 2 dimensional. It's a Summer "blockbuster", not a Merchant/Ivory flick, so no surprises there.
There were a few cute lines that made me laugh, but overall I just couldn't get too into the movie. The "student film" that is the namesake of the movie runs during the credits, and that's worth seeing. One thing I'll say about the cinematography; J.J. Abrams sure does love his lens flare effect. He went overboard on Star Trek and shows his affection for the flare in Super 8 as well. Dude- stop it.
On a side note, I went to see this movie at the AMC Theater in Tysons Corner, VA and was keenly aware of the dim quality of the picture. Having to pay extra for a digital showing and then having to squint is not my idea of good value. Why do I bring this up? You may not be aware, but AMC uses Sony 3D digital projectors which have been retro-fitted with updated hardware to be albe to show 2D films as well. Problem: AMC Theaters do NOT switch lenses when they switch between media types. So when you see a 2D digital film at an AMC, you are watching a movie that is losing about 50% of its luminosity due to the fact that the image is being split by the 3D lens. Don't believe me? Feel free to check online for the info (example). Want to know how to confirm that they're using the "wrong" lens? Look up at the projection booth...if you see 2 distinct images behind the glass...you're getting screwed over.
Saturday, June 11, 2011
Photos and Images
I've only recently started to take pictures of the work I've done over the past year or two. On my cinemafictions.com website there are many older photos of kits that I've built, but they aren't all that great. My pal over at 23Lines got me hooked on 40k about 3 years ago, and since then my regular scale modeling has pretty much been put on hold. I'm hoping to "catch up" a bit now that I'm at a stopping point. OK, if you are a tabletop wargamer, you know there's no such thing as a stopping point.
The Infinity figures were shot in a small photo lightbox...I'm still trying to get the hang of it. My digital camera is fairly old, and even with manual settings which allow for color correction, I still have to pull the photos in to Photoshop for additional balancing. So far I've had decent results, but as you can see I could do better.
Another revelation is how Blogger allows me to upload directly to a Picasa album but will only allow a maxium image size of 1600px (v axis). As a result, I think I'll leave the miniature photos as-is, but anything of a larger subject, like the Vanquisher, might benefit from being cut into paired images, rather than the stack of 4. So many kits...so little time.
Sunday, June 5, 2011
Yu Jing: Imperial Agent- Reindeer

The most dreaded of the secretive Imperial Agents. Rarely seen, rumored to be able to change his appearance at will, blending in with any environment.
Thursday, June 2, 2011


Tuesday, May 31, 2011

Yu Jing: Kuang Shi 1

Orange: Yellow, Gryphonne Sepia, Ogryn Flesh, Baal Red
Green: Snot Green, Devlan Mud (x2), Gryphonne Sepia
Grey: Fortress Grey, Badab Black
White: Space Wolves Grey, White, Asurmen Blue (.5), White highlights
Guns: Fortress Grey, Asurmen Blue, Badab Black (x2)
Sunday, May 29, 2011
Yu Jing: Celestial Guard 1

Orange: Yellow, Gryphonne Sepia, Ogryn Flesh, Baal Red
Green: Snot Green, Badab Black
Grey: Fortress Grey, Badab Black
Guns: Fortress Grey, Asurmen Blue, Badab Black (2)
Eyes are Ice Blue. Hair is Green with Yellow highlights, Asurmen Blue and Thraka Green washes. Some white highlighting. Imperial Service badge is Yellow and Black.


Wednesday, May 25, 2011
Yu Jing: Imperial Agent- Pheasant

Imperial Agent, Pheasant Rank.
Orange: Yellow, Gryphonne Sepia, Ogryn Flesh
Green: Snot Green
Grey: Fortress Grey
White: Space Wolves Grey, White, Asurmen Blue (.5), White Highlight
Sword: Shades of Yellow through White
Details picked out with some Bleached Bone. Coat tails painted with Bleached Bone details, heavily washed with Asurmen Blue and Thraka Green. Gold bits done up with Yellow, Gryphonne Sepia, and White. Ice Blue for the eyes.
Wednesday, May 18, 2011
Yu Jing: Hsien

Primary Armor: Yellow, Gryphonne Sepia
Green: Snot Green (w. Bleached Bone for highlight), Thraka Green
Cabling: Fortress Grey, Badab Black
Gun: Fortress Grey, Asurmen Blue, Badab Black (x2)
Sword was shades of Fortress Grey through White. Eyes are Ice Blue.
Sunday, May 15, 2011
Yu Jing: Wu Ming

Finally finished the Imperial Service minis. This one is the Wu Ming. Except for Vallejo Yellow, all paints used were GW.
Primary Armor: Yellow basecoat, Gryphonne Sepia, Ogryn Flesh, Baal Red (x2)
Secondary Armor: Fortress Gray, Badab Black, Thraka Green (.5)
Gun: Fortress Gray, Asurmen Blue, Badab Black (x2)
Cables: Fortress Gray, Badab Black
Highlights were created by carefully re-applying the basecoat colors. Eyes are ice blue. Gun sights are Snot Green.
Tuesday, May 10, 2011
Yu Jing: Incoming photos
During the Memorial Day weekend I spent a lot of time finishing off the Yu Jing Imperial Service army. I've already posted one progres photo of the Imperial Agent, but over the next week or so I'll be posting photos of all the figures.
Thursday, May 5, 2011
Infinity: Yu Jing...progress

I've been tweaking the final details on my Yu Jing miniatures. A little bit each night...just down to the eyes and army symbols before I paint the bases. This is the Imperial Agent (Pheasant). Photo isn't that good, and he's not quite done, but I thought I'd go ahead and post a proper progress photo.
Monday, April 25, 2011
Thursday, April 21, 2011
Death Korps of Krieg: Thunderer


This is the Forge World kit...I'm assuming it was a much older model since the casting was primitive to say the least. One giant hunk of warped resin that I wound up having to cook in a pot of boling water for about 5 minutes before it softened enough to be straightened out a bit. Nice looking vehicle, all things considered.
Sunday, April 17, 2011
Death Korps of Krieg: Punisher


I scratchbuilt this Punisher turret before GW released the plastic verion. It's a bundle of brass tubes wrapped in thinned styrene tube. The mantlet is sheet styrene and is based on the mantlet of the Macharius Vulcan.
The glacis plate has been heavily modified on this Leman Russ chassis, the same as the other two I've built. I don't like the forward hull-mounted weapon, the way it bulks up the profile of the tank. The Mars-Alpha pattern is much more to my preference, and though I didn't change the engine deck of the tanks, I did change the glacis plate. Sheet and strip styrene came to the rescue. The lascannon is Astartes issue, which is halfway between standard IG and DK0K. The canvas at the base of the lascannon is lightly textured Green Stuff.
Also, because I'm such a masochist, I decided that the hatches on the Forge World IG vehicles looked much better than the plastic versions and went ahead and scratchbuilt those as well. For every vehicle that was not Forge World. Every. Vehicle.
Tuesday, April 12, 2011


Tuesday, April 5, 2011
Death Korps of Krieg: Vanquisher


And now for something completely different...
The Vanquisher. I foolishly decided to start up a Death Korps army prior to the new Imperial Guard codex publication. On the positive side, I did make the vast majority of purchases from Forge World when the Pound was at a historically low rate vs. the U.S. Dollar. Anyway, I had several Leman Russ chassis available for use, having purchased several in their Apocalypse release boxes.
This is the only one I built with permanently attached sponsons. I have 2 others which only have empty sockets and are therefore not yet ready for prime-time. All the armor in my Krieg list was primed black, then rust followed by salt weathering, Tamiya German Grey, Tamiya Dark Grey...then the usual highlights. I used MIG Pigments on the treads.
My DKoK army armor uses alternating stripes to indicate unit type. The red and white markings indicate main battle tanks in my army. I also use tan and white for transports. Green and white for artillery. The turret is Forge World and is not permanently affixed to the chassis. I'll be posting more variants in the next few days.
Thursday, March 24, 2011
Blog and Website Updates
I've been posting photos of completed kits at a lightning pace, trying to "catch up" and populate the blog. I also have a static website that hasn't really been updated in a long while. The code is old and the pictures aren't all that great, so I'll probably revisit that site in a while. Hopefully the blog and the site will go hand in hand- the blog can show works in progress and a few shots of completed pieces while the site shows more images and detail shots. I also use the site as a reference for my own collection of model kits; sometimes I see something on eBay that catches my eye but I have to double check to see if I might already have it.
Back in '97 I had whittled down my backlog to a mere FOUR unbuilt kits. Then I went to Japan for the first time. I returned with a suitcase full of hard to find kits and began to shift from Model Builder to Model Collector. You have to remember that back in 97 we were still using rotary phones and had to get out off the sofa to change the channel on the TV set (which was a giant CRT in a wooden console that weighed just under half a ton). Hobbylink Japan wasn't around, and eBay was still new. If you wanted to find something rare, out of production, or imported...you had to do it the hard way. Kids today just have to type in a keyword search or hit eBay, HLJ, or any of a dozen forums and online communities to find what they want. I kind of miss "the hunt", but at least my wallet is recovering.
Anyway, as it currently stands, I have somewhere in the neighborhood of 110 unbuilt kits of various subjects. At my current rate, I'll be blind and long since retired before I get through them all. I might have been further along if Morgrimdark and I hadn't started playing 40k about 4 or so years ago. Even though I've put all non-gaming kits on hold, I have still managed to plow through over a dozen gaming vehicles and probably well over 100 figures. I have a full Death Korps army waiting to be painted (they're primed and ready to go otherwise) and a backlog of Space Marines that though not necessary could be nice. Heck, I even have a few Tau XV9 suits that need painting. Infinity has been a nice diversion- ten guys and I'm good to go. I like the minis. I like the game. It's a breath of fresh air and I think I'm going to stick with it for a while.
As time allows, I'll also go back to earlier blog posts and flesh them out with more details if warranted. After this missive, I'm going to describe the scratchbuilt detailing I did on the Death Korps tanks. Thanks for joining me for the ride.
Tuesday, March 15, 2011
Tau: Tetra
The Tetra is another example of a nifty looking Tau unit that follows their alien design aesthetic. I love the sleek lines of the vehicle, and find the concept of a "hard top canopy" with open sides to be quite intriguing. It's just a really pretty skimmer.

On the other hand, even though it's a relatively cheap unit, it's also relatively useless. It's stealthy and fast, which balances out it's total lack of armor. It has the same firepower as an infantryman but carries a markerlight. Clearly it is meant as a scout vehicle or forward observer. The problem is it takes up a Fast Attack slot and with only the single markerlight there is hardly anything you can do with it in a regular game. Now, throw it on the board in an Apocalypse game and you can get away with a lot of mischief...

Building the Tetra was quick and mostly easy. The slight warping of the "canopy" was fixed with hot water. I did have to fill in some misaligned moldings, but they were not too bad. The mold release on the Tetra was so bad that I had to sand down every surface to some degree. The pulse rifles mounted on the chin were poorly cast and as a result I simply used leftover plastic rifles from my Fire Warrior stash.

Wednesday, March 9, 2011
Tau: XV88 Broadsides

I've said it before, and I'll say it again- Forge World kits are a crap-shoot. You may get perfection, you may get a pain in the ass. The XV88 is a far superior design to the standard XV8. It's also a far more labor intensive kit to build. The rail cannons were badly warped, the ammo belts would not align, there were mold separation marks that ran deep like valleys... but the design is awesome and the detail is sharp.
So, you take the good you take the bad, you take them all and then you have the Facts of...uh, sorry...got side tracked into a sit com from the 80s.
Immersion in boiling water will help fix the warped pieces and allow you to connect mis-aligned parts. Pinpoint application of superglue and small quantities of Green Stuff will fill bubbles and voids
One other major issue with Forge World kits is the mold release agent they use. Whatever it is, it's industrial strength. It is the only thing I've ever seen to make superglue bead up on application. I've soaked the parts in water, soap, detergent, Windex, alcohol, coke, and Simple Green. Sometimes, no matter how much I try to get the mold release off the part, it just won't go. As a result, I ALWAYS prime Forge World kits. I have a Forge World Vindicator that has a siege shield which I've primed and painted (partially) at least 3 times... and the paint still won't adhere, even after sanding down the part. The only other possibility is that the kits were sold before the resin fully cured and it's either still setting or de-gassing.

Back to the Broadsides...posing the kit is tricky because not only do you have to get the legs in a decent position (you can get a dynamic pose on the 60mm base, but in-game you are better off with the 40mm base), you have to get the arms mounted as well. The arms are trickier than the legs, because the XV88 has under-slung rail cannons which are further supported by auxiliary arms that run between sockets in the rear of the gun and sockets in the lower part of the backpack. That means when connecting the arms you need to take in to account the arm, ammo feed, and auxiliary arm...3 connection points, all at once. It's only slightly nightmare-ish.
When I'd finally assembled and primed the suits, I airbrushed Tamiya Buff over everything, followed by a wash of Devlan Mud and drybrushing of Vallejo Sand. Mechanical bits were painted Chaos Black with Fortress Grey highlights. Red panels were painted Vallejo Vermilion with highlights of Vermilion mixed with Vallejo Flat Yellow. Missile pod details were picked out with Fortress Grey and Skull White highlights.
Bases are medium and fine ballast...unpainted. I ought to go back and add something there. The figures are pinned to the bases using paperclips that run through the lower legs and feet then through the base, under which they hook into "L" shapes secured by superglue. The ankles are insanely delicate and require re-enforcement.
Broadsides are a lot of fun in the game...I've often been tempted to buy another. But no...I must...resist...
Saturday, March 5, 2011
Tau: Vespid Stingwings

Vespid. The very name sends shudders of fear through my opponents.
Wait...did I say "fear"? I meant "laughter".
Yeah, probably the worst option in the Tau codex, the Vespid are slightly over-priced, slightly under-powered, and very out-classed by the other Fast Attack options in the codex. Sure, you could use Vespid as a rapid reaction force, but with Tau, if your enemy is that close, you're already boned. You could use them as a suicidal unit to threaten your enemy, but against MEQ they'll get shot to pieces before doing much damage, and against GEQ they'll get swamped. In the handful of games where I have run Vespid they have not done well by any definition of the word.
They look good, though, and were fairly easy to paint. Since they're metal, the poses are limited. If GW upgraded their rules and released plastics, they might actually sell. Anyway, the metals were assembled and primed Armory White. I didn't bother with a base coat, but did add a few blue splotches around the figures. After that I just washed the figures with light washes of Asurmen Blue and even lighter Thraka Green and Badab Black. I did a very light and quick drybrush of Skull White. Claws were painted with Fortress Grey and washed with Badab Black at the roots. Another quick drybrush of Skull White picked out the edges.
Tausept Ocher came to the rescue for the neutron blasters, torso armor, and communion helm. Highlights came from Bleached Bone. The crystals in the blasters were left primed, then washed with Thraka Green and given a Skull White highlights along the edges. The leader's wing bling and gold bosses on the blasters got the standard Tau gold treatment.
Bases were medium and light ballast with a few chips of styrene sheet. The figures were molded with "something" under their feet, so I had to replicate that on the ground work for the bases.
Monday, February 28, 2011
Tau: Shadowsun

Shadowsun is a rather impressive little metal miniature. Very detailed and heavily influenced by the Anime style- even more so than the rest of the Tau army, in my opinion. The only thing that stands out is the blocky barrel at the end of each fusion blaster. I think they'd look better if they had rounded edges. Converting/modifying would have been fairly easy. Option A would have been to simply sand down the edges. Option B would have been to clip off the blocky barrels entirely and build styrene strip/sheet/half-round replacements. Generally, I tend to skip these sorts of mods and regret them later. It saves time that way. If you have read my earlier posts, you'll see I have far too many unbuilt kits to take time for the fiddlies. Anyway, I wanted to run Shadowsun sooner rather than later, so she got a quick and dirty treatment.
Painting was very simple. Armory White primer, followed by successive, lightened washes of Asurmen Blue and Badab Black. Once I had sufficient depth of color, I went over the entire figure with a quick drybrush of Skull White. Then I cleaned up the edges and added highlights with several applications of thinned Skull White. Joints and other mechanical details were painted Chaos Black and highlighted with Fortress Grey. I used Tausept Ochre for the fusion cannons, highlighted with Bleached Bone. Gold parts, as with all my Tau, started with a mix of Scorched Brown and Shining Gold, was followed by Shining Gold, and finished with Burnished Gold highlights.
Shadowsun comes with a pair of shield drones (not pictured) and a command link drone. These were painted the same way as Shadowsun herself. Though Shadowsun comes with a slot base, she's molded to look like she is landing on (or leaping off) a piece of rubble. I added some medium and light ballast from Woodland Scenics to the base to flesh out the piece. Scorched Brown, Badab Black, and a Bleached Bone drybrushing finished off the groundwork. The fence post was painted with Graveyard Earth, washed with Badab Black, then highlighted with Kommando Khaki.
I like running Shadowsun, but she tends to be a one-trick pony. Sure, if you are lucky (and run a Positional Relay and Pathfinder Devilfish) you can get her in your opponent's rear and punk two vehicles on the turn she arrives, but not always. Deep striking can work out really well or really poorly. Even with an invulnerable save and multiple wounds, her ridiculously low toughness means she can be instantly killed by just about anything. Her three attached drones will provide ablative wounds, but it's still rarely enough. Of course, like any Tau, once she gets in to close combat... Ah, well.

Wednesday, February 23, 2011
Tau: Shas O' Rmyr


I got a bit bored with the Tau character options and decided to pick up Rmyr when a relatively large Forge World order was placed. The kit itself was relatively hassle-free, mostly because the rear torso and jet pack components were from the plastic Crisis Suit. Forge World castings are always hit or miss. They're terribly inconsistent and when they're bad they're really bad. Since it's such a crap shoot, I have to take a deep breath any time I place an order. Rmyr had some slight warping and only a few pinholes. Both were easily fixed.
Posing Rmyr was tricky, since the joints have to be bonded using cyanoacrylate or epoxy cements. CA glue leaves less gunk to clean up, but cures very quickly. Epoxy allows for some working time but tends to leave gunk. I have been using CA, but in future may mix and match...using epoxy to join and pose from the torso down, then CA for the arms and feet and head where a faster setting cement would be beneficial.
Painting was straight-forward. Even though my Tau army is based on the Viorla sept, I wanted O'Rmyr to be the actual O'Rmyr and not a "counts as". Therefore I used the standard Tau color scheme. I primed Rmyr with Armory White, then covered most of him with Tausept Ochre. I lightened that up with highlights of Bleached Bone. Red Gore was used for the shield, pads, and other panels. Highlights were made from Red Gore and a touch of Bleached Bone. The black mechanical components were Chaos Black with Fortress Grey highlights. The gold bosses were painted with a mix of Scorched Brown and Shining Gold, followed by Shining Gold, and finally a highlight of Burnished Gold. The plasma guns and shield highlights were painted with gradients of Ultramarines Blue through Ice Blue. The base was a messy mix of Chaos Black with dabs of Scorched Brown, various washes, and a Bleached Bone drybrush. The Astartes standard had some gold on it, and a barely visible wolf's head was picked out with very diluted Bleached Bone.
Subscribe to:
Comments (Atom)